LVT and vinyl floor coverings
LVT and Vinyl flooring work well with Wunda underfloor heating systems and are becoming increasingly popular. It’s important to always check with your supplier that the flooring you choose works with underfloor heating. Some vinyl and LVT flooring need to be limited to a maximum floor temperature of 27 degrees. This will be done by the floor probe that is supplied for each zone that uses this type of flooring. If you are using LVT, it is also necessary to ensure the flow temperature measured at the manifold doesn’t exceed 45°C.
These guidelines have been created to help you confidently install LVT and Vinyl floor coverings over your Wunda Rapid Response® boards as part of a complete Wundafloor® system.
When installed correctly, your Wundafloor provides a stable, efficient, and highly responsive heated floor designed to work seamlessly with LVT and Vinyl floor finishes.
Your LVT or Vinyl floor finish can be installed on the Rapid Response panels using self levelling compound. In order for a smooth process, please take into account the following guidance:
Preparation
You may need to allow the floor finish to acclimatise before installing, check your suppliers’ instructions for more details.
In order to protect your floor, it is necessary to use a room sensor or thermostat that has a facility to accommodate a floor probe, which is located directly under the floor finish. This will be set to cut out the heating at a floor surface temperature of 27°.
Installation Method 1 – Duo Board
U04 – Duo board & Vapour barrier factsheet
Duo board
Firstly, Wunda Duo board can be used as an intermediate layer *before the Duo Boards are installed, lay an 800 gauge (200µm) vapour barrier over the top of the boards and pipework. (See document “U04” for details on the vapour barrier and laying.)
Duo board consists of 2 layers of HDF (high density fibre). The Bottom board is 3mm and top board is 3mm, so the total depth of the board is 6mm. The Duo board layers have 0.5Tog total of thermal resistance, so carpet and underlay combined need to be 2 tog or less. Duo board cannot be used in wet areas such as bathrooms due to the risk of the boards expanding when in contact with moisture.
Heat Pak: Bottom board = 4mm. Top board = 3mm*
- The Duo board is installed with the bottom board free floating. The bottom board has an adhesive layer for the top board to be adhered to, simply peel back the paper backing to expose the adhesive.
- The boards need to be laid in a staggered brick bond format so the joints are staggered and overlapping the joints in the bottom boards.
- When fitting the Duo boards in a room, leave an 8-10mm expansion gap around the perimeter of the room. An expansion joint needs to be allowed for every 8 linear meters of between 5 to 10mm and it can be filled using a flexible sealant or filler.
Installation Method 2 – Self Levelling Compound
Alternatively, an approved levelling compound can be used as an intermediate layer to give a smooth surface for the carpet and underlay. This would also mean perimeter strip is necessary to be fitted around the room to allow expansion.
It is important to carry out a pressure test of the floor heating system and pipes prior to applying any primers and levelling compounds.
Before pouring any levelling compounds, ensure that all Rapid Response® boards are securely bonded to the subfloor and that there is no movement in the boards. It is important that any movement in the boards or joints between boards is addressed and remedied before levelling compounds are poured. Additional Secure fixing of the boards may be required using large washers and screws, if movement is detected.
The aluminium of all unused pipe channel’s must be cut to expose the empty channel, ready for filling with your chosen levelling compound.
It is crucial to always prime the boards first with the approved and relevant primer, before laying the approved self levelling compound.
The Wunda approved levelling compounds are:
‘10mm Ultra ProLevel Ultimate’, when primed first using ‘Ultra Prime it multi surface primer’.
‘10mm Mapei Ultraplan Renovation Screed’ when primed first with ‘Mapei Eco Prim Grip’.
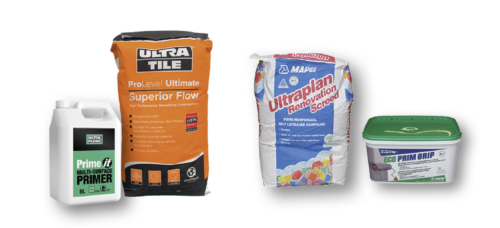
The levelling compounds and primers are not provided by Wunda. They can be sourced from local merchants or online and the relevant ratios will be included on their instructions.
Self levelling compound curing time
Self levelling compounds/screeds must be allowed to cure naturally. Be sure to check the manufacturer’s specific requirements. Do not use the underfloor heating system to accelerate the curing process.
When activating the heating, increase the temperature gradually. If you have a mixing valve begin with the it set to the minimum position and increase slowly by up to 5°C each day until the desired operating temperature is reached. If you are coming from a low temperature heat source, ensure the flow temperature supplied is low to start and slowly increased by up to 5°C each day until the desired operating temperature is reached.
Floor probe
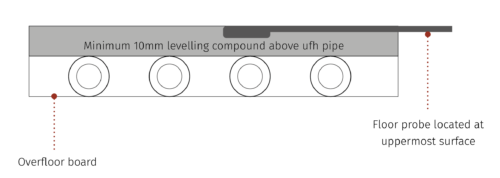
LVT and vinyl flooring are temperature sensitive and require a floor probe to prevent surface temperatures from exceeding 27°C. Always confirm the specific surface temperature limit with your flooring supplier. To protect your flooring from overheating, use a thermostat or sensor that supports a floor probe. The probe must be in direct contact with the finished floor surface. When using a self-levelling compound, allow it to fully cure before placing the probe on top—this ensures the probe remains in contact with the floor finish. A small channel may need to be chased into the compound so the probe can sit flush beneath the floor covering. Similarly, when installing Duo Boards, chasing may also be required to accommodate the probe and ensure it remains properly positioned. Make sure the probe is installed before laying your final floor finish.
Installing LVT and Vinyl Floor Coverings
When laying the floor finish, an expansion gap needs to be incorporated around the perimeter, please be sure to check and follow your suppliers instructions. If possible, try to ensure the floor finish runs at 90° perpendicular to the pipe runs to avoid joins running parallel with the pipes. This isn’t essential but good practice and it should have already been communicated to the Wunda team at the design stage and reflected in your board and pipe layout plan.
Turning on your heating
When finished installation keep the floor at ambient temperature for a minimum of 7 days with the floor heating switched off. When turning the floor heating on, start with the mixing valve on minimum and slowly increase the flow temperature up to 5°C per day.
Download Wunda Rapid Response® floor coverings information