How To Install Wunda Rapid Response® Boards & Underfloor Heating Pipe
Installing Wunda Rapid Response® boards and underfloor heating pipework is the second stage of creating an efficient low-profile underfloor heating system.
During this phase, the insulation boards are positioned and bonded to the subfloor, pipe channels are prepared, heating pipework is installed according to the supplied design layout, and floor probes are fitted where required.
Correct installation at this stage helps ensure:
- Maximum heat transfer performance
- Stable floor construction
- Accurate pipe positioning
- Easier manifold connection during Phase 3
- Long-term system reliability
This guide is suitable for both DIY installers and professional contractors installing a Wunda Rapid Response® underfloor heating system.
What You’ll Learn In This Guide
In this phase you will learn how to:
- Install perimeter strip or battens where required
- Dry lay and prepare Rapid Response® boards
- Bond boards securely to the subfloor
- Install transitional boards
- Route additional pipe channels
- Lay underfloor heating pipework
- Install floor temperature probes
- Prepare the system for pressure testing and manifold connection
Before You Begin
Before starting Phase 2, ensure all preparation work from Phase 1 has been completed.
The subfloor should be:
- Level
- Stable
- Clean
- Dry
- Free from dust and debris
These instructions are intended for use with Wunda systems only. Using alternative components or installation methods may affect performance and could invalidate warranties.
Step 1 – Preparing The Room Perimeter
Before installing the Rapid Response® boards, you should determine whether perimeter strip or timber battens are required based on the final floor finish.
Different floor coverings require different preparation methods to accommodate expansion, floor movement and installation requirements.
When Is Perimeter Strip Required?
Perimeter strip creates a small expansion gap around the edge of the room and helps reduce heat loss at wall junctions.
Perimeter strip should be installed when:
- The final floor finish will be tile or stone
- A self-levelling compound will be used
- An expansion gap is required around the floor perimeter
Perimeter strip is generally not required when:
- Installing engineered wood flooring
- Installing laminate flooring as a floating floor with breathable XPS underlay
- Installing carpet over Wunda Duo Boards with perimeter battens
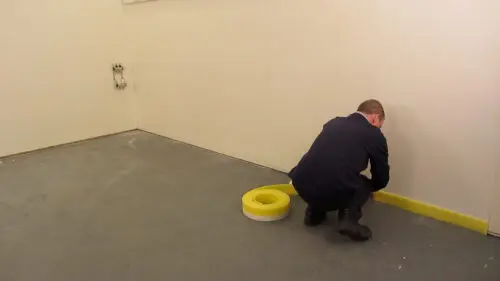
How To Install Perimeter Strip
Before laying the boards:
- Remove skirting boards where required
- Remove doors that may require trimming later
- Ensure walls are clean and free from loose debris
Apply the perimeter strip around the entire heated area using the self-adhesive backing.
Any excess height can be trimmed after the final floor finish has been installed and before skirting boards are refitted.
[Image: Perimeter strip installation]
Installing Battens For Carpeted Floors
Where carpet is being installed over a completed system using Wunda Duo Boards, timber battens should be fitted around the perimeter of the room and across door thresholds.
The battens provide a secure fixing point for:
- Carpet grippers
- Door thresholds
- Transition strips
Use battens that match the height of the Rapid Response® boards.
After the heating system has been pressure tested:
- Lay the vapour barrier across the floor
- Fix carpet grippers through the vapour barrier into the battens
- Avoid fixing into heating panels or pipework
Take particular care around doorways where heating pipes may pass beneath the floor finish.

Step 2 – Dry Lay The Rapid Response® Boards
Why Dry Laying Is Important
Dry laying allows you to confirm board positioning before adhesive is applied.
This stage helps identify:
- Required board cuts
- Additional routed channels
- Pipe routes through walls
- Areas requiring transitional boards
Review the supplied pipe and board layout drawing carefully before starting.
If you are unsure about any aspect of the layout, contact the Wunda technical team before proceeding.
Positioning The Boards
Lay the boards according to the supplied layout drawing.
Where cutting is required:
- Use a fine-tooth saw or sharp craft knife
- Use a straight edge for accurate cuts
- Wear gloves when handling boards, as the aluminium layer can be sharp
Retain any offcuts as they may be useful elsewhere within the installation.
If a board is cut incorrectly, sections can often be bonded together within non-critical areas.
Mark Additional Pipe Channels
Some installations require extra routed channels to accommodate the designed pipe layout.
Using a marker pen:
- Mark all areas requiring routing
- Maintain smooth curves and gradual bends
- Avoid creating tighter bends than those already formed within the board system

Preparing Pipe Routes Through Walls
Some designs require pipework to pass through internal walls.
Before fixing boards:
- Mark pipe locations
- Drill openings large enough for conduit or pipe sleeves
- Use 25mm conduit where possible
- Check carefully for hidden services before drilling
Conduit allows the pipe to move freely as it expands and contracts during operation.

Step 3 – Bond The Boards To The Subfloor
Once the board layout has been confirmed, the boards can be permanently bonded into position.
Materials Required
- WundaSpray board adhesive
- Rapid Response® boards
- Protective mask
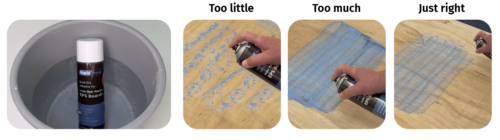
Preparing The Adhesive
For best results:
- Warm adhesive cans in warm water
- Shake thoroughly before use
- Continue shaking periodically during installation
Failure to properly warm and shake the adhesive may reduce coverage and bond strength.
Installing The Boards
Before applying adhesive:
- Remove dust and debris
- Confirm board positions
- Ensure the subfloor is dry and stable
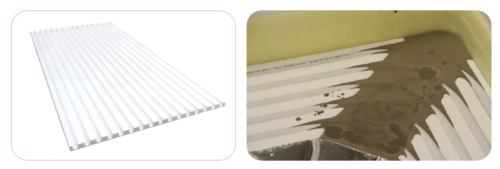
Rapid Response® boards can be bonded to:
- Concrete
- Screed
- Timber subfloors
Apply WundaSpray adhesive according to the installation instructions.
Ensure boards are positioned tightly together with no gaps between adjoining panels.
A short piece of pipe can be used to check alignment between neighbouring pipe channels.
Once bonded, confirm all boards are secure before moving on to the next stage.
Troubleshooting Board Movement
If movement is detected:
- Check that adhesive was correctly warmed
- Check that the correct spray pattern was used
Where necessary, boards can be reinforced using stainless steel screws and large washers at approximately 300mm centres.
Understanding Transitional Boards
Transitional boards are designed for areas where multiple heating circuits need to pass through narrow spaces, such as hallways and doorways.
They allow several pipe loops to travel side-by-side from the manifold to the rooms they serve.
Manufactured from the same high-density material as Rapid Response® boards, transitional boards can be cut and shaped to suit the layout drawing.
Installing Transitional Boards
Transitional boards are bonded using the same adhesive method as standard Rapid Response® boards.
Where pipework needs to turn a corner:
- Create opposing 45-degree cuts
- Leave approximately 120mm between channels
- Allow sufficient space for the pipe to bend smoothly
Avoid forcing tight bends into the pipework.
Where gaps remain between channels, these can be filled using a suitable levelling screed to support the pipe.
Alternatively, a standard board can be routed to create the required channel arrangement.
Step 4 – Route Additional Pipe Channels
Once all boards have been secured:
- Route any marked channels using a suitable router
- Set the router depth to match the pipe size being installed
- Remove all debris from the routed channels
A vacuum cleaner should be used to remove dust from both the board surface and the channels.
Clean channels help ensure pipework sits fully within the floor system.
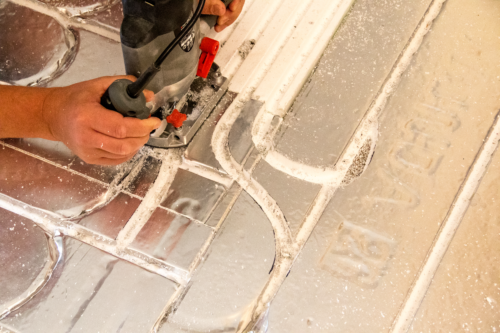
Step 5 – Install The Underfloor Heating Pipe
Installing the pipework correctly is critical to system performance and ease of commissioning.
Review The Pipe Layout Drawing
Before laying any pipe:
- Confirm manifold location
- Identify loop lengths
- Locate flow and return positions
- Check which pipe coil corresponds to each loop
Some shorter loops may share a longer coil, so review the drawing carefully before cutting any pipe.
Preparing The Pipe
Carefully cut the sealed end of the pipe to release any internal pressure.
Always:
- Point the pipe away from people
- Use a suitable pipe cutter
- Ensure cuts are square and clean
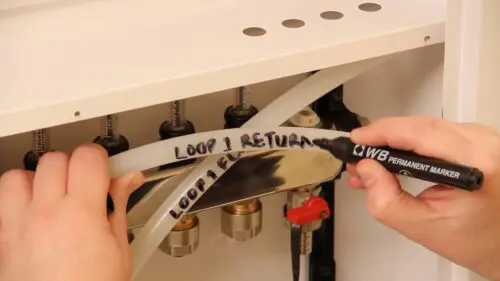
Mark each pipe loop with:
- Loop number
- Flow identification
- Return identification
The supplied drawing identifies:
- Red dot = Flow
- Blue dot = Return
Labelling loops now makes manifold connection significantly easier later.
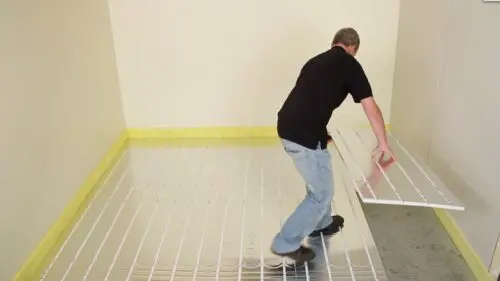
Laying The Pipe
Begin at the manifold position.
Allow:
- Approximately 1 metre of excess pipe for the flow connection
- Approximately 600mm for the return connection
Follow the supplied pipe layout drawing and press the pipe firmly into the channels.
Many installers find it easiest for:
- One person to guide the coil
- One person to press the pipe into the channels
As the pipe is installed, the perforated aluminium sections will fold around the pipe to improve heat transfer.
[Image: Installing pipe into channels]
Preventing Pipe Twist
When a loop changes direction at the end of a run:
Rotate the entire pipe coil by 180 degrees.
This helps:
- Prevent pipe twisting
- Reduce installation stress
- Keep the pipe seated within the channels
If a section lifts from the channel, gently tap it back into place using a timber batten.
Aluminium tape can also be used where additional retention is required.
If A Pipe Kinks
Avoid forcing tight bends into the pipe.
If a kink occurs:
- Protect the pipe with a cloth
- Carefully reshape using pliers
- Avoid damaging the pipe surface
Severe damage may require replacement of the affected loop.
Continue until all loops shown on the design drawing have been installed.
Where pipes pass through walls, one installer should feed the pipe while another receives it on the opposite side to reduce the risk of kinking.
Step 6 – Install Floor Temperature Probes
If the final floor finish is temperature sensitive, such as:
- Engineered wood
- Solid wood
- Laminate flooring
A floor temperature probe should be installed.
The probe helps protect the floor covering by monitoring floor temperatures and working alongside the thermostat.
Installing The Probe
Position the probe so the sensor tip will be in contact with the underside of the finished floor covering.
To achieve this:
- Peel back the aluminium layer around the probe position
- Ensure the sensor itself does not contact the aluminium
- Route a small channel for the probe cable
- Run the cable back to the thermostat location
Choose a thermostat location away from:
- Direct sunlight
- Radiators
- Other heat sources
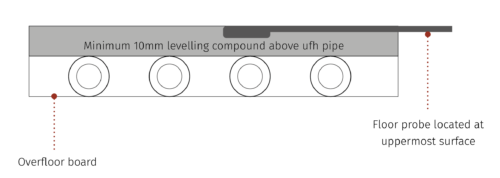
Using Levelling Compound
Where an approved self-levelling compound will be installed, the probe should be fitted after the levelling compound has cured and following a successful pressure test.
Preparing Unused Pipe Channels
Some floor finishes require a self-levelling compound to be installed over the completed system.
Before applying the compound:
- Cut the aluminium covering from all unused pipe channels
- Expose the empty channels fully
- Prepare the channels to receive levelling compound
This helps create a smooth and stable finished surface.
Final Checks Before Phase 3
Before proceeding:
- Confirm all pipe runs are continuous
- Ensure there are no joints beneath the floor
- Check all boards are securely bonded
- Ensure pipework sits flush within the channels
- Confirm floor probes have been installed where required
Completing these checks now can help avoid issues during pressure testing and commissioning.
Common Mistakes To Avoid
Avoid the following installation errors:
- Forgetting to dry lay boards before bonding
- Leaving gaps between boards
- Failing to warm adhesive before use
- Routing channels too tightly
- Forcing pipe bends
- Forgetting to label flow and return loops
- Omitting floor probes beneath timber floors
Taking time to complete each stage carefully will help maximise system performance and installation reliability.
Ready For Phase 3
Once all boards, pipework and probes have been installed successfully, you are ready to proceed to Phase 3.
The next stage covers manifold installation, pressure testing and preparing the system for commissioning.
Download Phase 2: Installing the pipe and Wunda Rapid Response® boards – DIY & professional guide