How To Connect Underfloor Heating Pipe To A Wunda Manifold & Pressure Test The System
Once your Wunda Rapid Response® boards and underfloor heating pipework have been installed, the next stage is to connect the heating circuits to the manifold, fill the system with water, remove any trapped air, and carry out a pressure test.
This is one of the most important stages of any underfloor heating installation. Correct manifold installation and pressure testing help ensure the system is operating safely, all pipe connections are secure, and there are no leaks before the floor finish is installed.
This guide is suitable for both DIY installers and professional contractors installing a Wunda underfloor heating system.
What You’ll Learn In This Guide
In this phase you will learn how to:
- Assemble and position the manifold
- Install the pump set
- Mount the manifold securely to the wall
- Prepare underfloor heating pipe connections
- Connect pipe loops to the manifold
- Fill the system with water
- Remove trapped air from the system
- Carry out a pressure test before installing the final floor finish
Before You Begin
Before starting Phase 3, ensure that Phase 2 has been completed successfully.
You should have:
- Installed all Rapid Response® boards
- Installed all pipework according to the supplied layout drawing
- Labelled all flow and return pipe ends
- Installed floor probes where required
- Confirmed all pipework is securely seated within the board channels
It is important that no floor finishes, levelling compounds or intermediate layers are installed until the pressure test has been completed successfully.
These instructions are intended for use with Wunda systems only. Using alternative products or installation methods may affect system performance and could invalidate warranties.
How Long Does Phase 3 Take?
Most installers should allow approximately five hours to complete this phase.
This includes:
- Manifold assembly
- Pipe connection
- Filling the system
- Air removal
- Pressure testing
The pressure test should remain in place for a minimum of three hours before proceeding to the next stage of installation.
Some homeowners may choose to leave manifold commissioning and heat source connection to a qualified heating engineer. However, many of the preparation and pressure testing steps can be completed by competent DIY installers.
Understanding The Role Of The Manifold
The manifold is the central distribution point of your underfloor heating system.
It controls the flow of heated water to each individual heating loop and allows each circuit to be balanced for efficient performance.
A correctly installed manifold helps:
- Ensure even heat distribution
- Simplify system maintenance
- Improve heating efficiency
- Allow individual loop adjustment
- Support future servicing and commissioning
The manifold location will be shown on your supplied Wunda layout drawing.
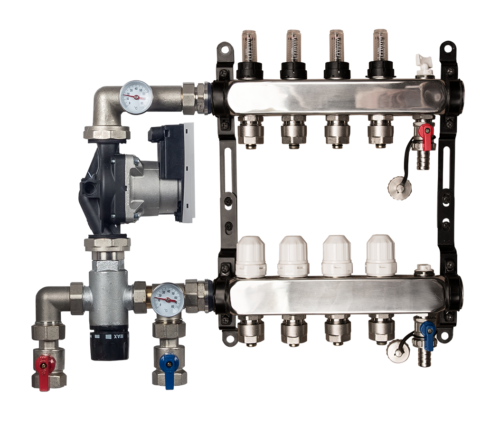
Step 1 – Assemble The Manifold & Pump Set
Materials Required
- Adjustable spanner
- Screwdriver
Before mounting the manifold, assemble the manifold and pump set according to the supplied installation instructions and technical factsheets.
Take time to confirm:
- All components are present
- Connections are secure
- Isolation valves are correctly fitted
- The pump set has been assembled according to the supplied documentation
A correctly assembled manifold helps simplify the remaining installation stages and reduces the likelihood of leaks during filling and testing.
Step 2 – Mount The Manifold
Materials Required
- Screws
- Wall plugs
- Drill
- Screwdriver
Once assembled, the manifold can be mounted in its designated location.
Refer to the supplied Wunda layout drawing to confirm the correct position.
Choosing The Correct Location
The manifold should be installed:
- In the location shown on the design drawing
- Where future access is possible
- On a suitable wall capable of supporting the manifold and associated pipework
- In a position that allows easy connection to the heat source
The lower manifold rail should be positioned at least 300mm above floor level.
This clearance allows the underfloor heating pipes to enter the manifold comfortably without excessive bending or stress on the pipework.
Secure the manifold using suitable fixings appropriate for the wall construction.
Why Correct Manifold Positioning Matters
Installing the manifold at the correct height and location helps:
- Reduce strain on pipe connections
- Improve access for maintenance
- Simplify balancing and commissioning
- Improve the appearance of the finished installation
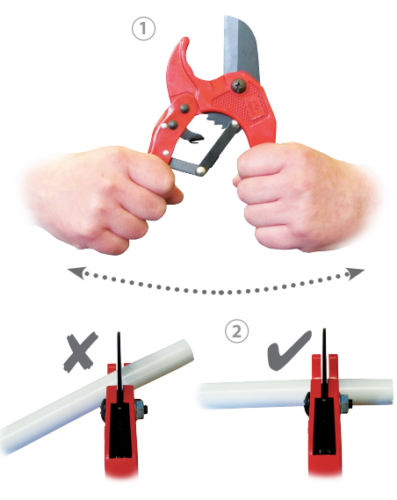
Step 3 – Prepare The Pipe Connections
Materials Required
- Pipe cutter
- Reaming tool
- Gloves
Before connecting any pipework, identify and organise each heating loop.
The supplied layout drawing identifies:
- Flow ends using a red marker
- Return ends using a blue marker
Correctly identifying each loop now makes balancing and commissioning significantly easier later.
Cutting The Pipe To Length
Trim each pipe to the required length using a suitable pipe cutter.
Always ensure cuts are:
- Clean
- Square
- Free from damage
Poorly cut pipe ends can affect the quality of the manifold connection.
Reaming The Pipe Ends
Once cut, use the reaming tool to create a slight bevel on the pipe end.
This helps:
- Protect seals during installation
- Improve connection quality
- Reduce the risk of damaging fittings
A useful tip is to hold the pipe firmly while wearing gloves to prevent the pipe twisting during reaming.
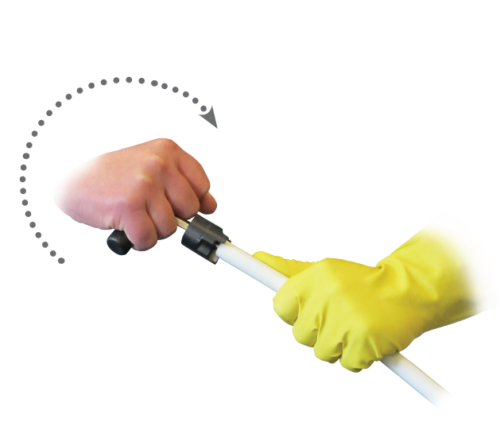
Why Reaming Is Important
Reaming removes any sharp edges created during cutting and helps create a smoother connection between the pipe and manifold fitting.
Skipping this step can make installation more difficult and may increase the risk of leaks.
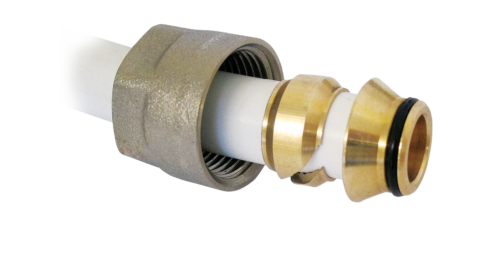
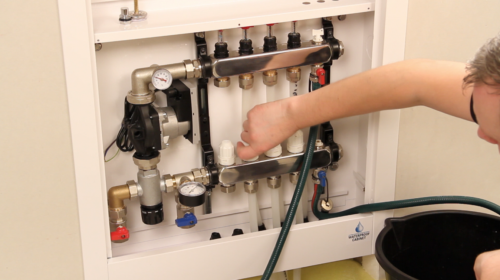
Step 4 – Connect The Pipe Loops To The Manifold
Materials Required
With the pipe ends prepared, each loop can now be connected to the appropriate manifold port.
Connecting The Fittings
For each pipe connection:
- Slide the manifold nut onto the pipe.
- Fit the split olive flush with the pipe end.
- Insert the pipe insert fully into the pipe.
- Ensure the insert is fully seated against the pipe end.
- Push the pipe into the manifold connection.
- Hand tighten the nut.
- Fully tighten using a suitable spanner.
Repeat this process for every flow and return connection.
Checking Connections
Before filling the system:
- Confirm all nuts are tightened correctly
- Check all pipe inserts are installed
- Verify each loop is connected to the correct manifold port
Taking a few extra minutes to inspect connections can help avoid delays during pressure testing.
Step 5 – Fill The System & Carry Out A Pressure Test
Materials Required
- Drain hose
- Bucket
- Spanner
Once all pipework has been connected, the system can be filled and pressure tested.
This is one of the most important stages of the installation process.
Why Pressure Testing Is Essential
Pressure testing confirms:
- Pipework is leak free
- Manifold connections are secure
- The system is ready to be covered by the final floor finish
If any issues are identified during testing, repairs can be carried out while the pipework remains fully accessible.
For this reason, floor finishes, levelling compounds and intermediate layers should not be installed until a successful pressure test has been completed.
Filling The System
Fill the system with water according to the Wunda manifold installation instructions.
As the system fills:
- Purge air from each heating loop
- Ensure all circuits are filled completely
- Continue until no further air is discharged
Removing trapped air is essential for efficient heating performance and accurate pressure testing.
Carrying Out The Pressure Test
Follow the detailed procedure outlined in the supplied Wunda manifold documentation.
Once pressurised:
- Inspect all manifold connections
- Check pipework for signs of leakage
- Monitor the pressure reading
- Leave the system under pressure for a minimum of three hours
Any pressure loss should be investigated before proceeding.
What To Do If The Pressure Test Fails
If the pressure test identifies a leak:
- Do not install the floor finish
- Identify the source of the issue
- Repair or replace affected components
- Repeat the pressure testing procedure
Only proceed once a successful pressure test has been achieved.
Common Mistakes To Avoid
Avoid these common installation errors:
- Connecting flow and return pipes incorrectly
- Failing to label loops before installation
- Not reaming pipe ends
- Overtightening manifold fittings
- Forgetting to purge trapped air
- Installing floor finishes before pressure testing
- Skipping final connection checks
Taking time during this stage can help prevent costly remedial work later.
Final Checks Before Phase 4
Before moving on to the next stage:
- Confirm all loops are connected correctly
- Check all manifold fittings are secure
- Verify the system has passed its pressure test
- Ensure no leaks are present
- Confirm all air has been removed from the system
Once these checks have been completed successfully, the system is ready for floor preparation and floor finish installation.
Ready For Phase 4
Your Wunda underfloor heating system is now connected, filled and pressure tested.
The next stage covers preparing the system for the final floor finish and completing the installation.
Download Phase 3: Preparing and connecting the pipe to the manifold – DIY & professional guide